Tuesday, November 18, 2008

Change Tracking (Not CDC)

Change Tracking has a similar name to Change Data Capture and has caused some minor confusion. Change Tracking, however, is entirely different and serves a separate purpose.

CDC is an asynchronous process that captures row level changes and stores them in special change tables. This information is available as relational data and can be queried by client applications.

Change Tracking is synchronous and tracks data changes but stores only the fact that they were changed and the last value for the row. Both one-way and two-way synchronization is supported, but remember that with two-way conflict detection is supported but the client  is responsible for handling it.

Change Tracking uses tracking tables to store the primary key of the modified rows along with version numbers. It is easy to detect version conflicts.

  1. An application requests the version number for a row it intends to modify.
  2. If the version has changed since the last request, there is a conflict.
  3. Solving the conflict is up to the requesting application.

In order to work with Change Tracking there are a few steps to do.

  1. Enable Change Tracking at the database level.
  2. Enable Change Tracking at the table level.
  3. Use CHANGE_TRACKING_MIN_VALID_VERSION function to get the minimum version, which is an integer. This value can be used to get the changes for a specific table.
  4. Use CHANGETABLE function to get information , such as changes, types of changes, columns that changed, etc.
  5. Use CHANGE_TRACKING_CURRENT_VERSION function to get the current version. This is set by the last transaction committed in the database.
  6. Use the WITH CHANGE_TRACKING_CONTEXT() hint to specify a context for data modifications. This allows data modifications to be grouped according to client or application.

Let's look at some code that will show some of the basics.

USE master;
GO
--Create a test database if necessary
IF NOT EXISTS(SELECT * FROM sys.databases WHERE [name]=N'MyDB')
    CREATE DATABASE MyDB;
GO
--Configure the database to allow change tracking
IF NOT EXISTS(SELECT * FROM sys.change_tracking_databases 
WHERE database_id = (SELECT database_id FROM sys.databases WHERE [name]=N'MyDB'))
    ALTER DATABASE MyDB SET CHANGE_TRACKING = ON 
    (CHANGE_RETENTION = 2 DAYS, AUTO_CLEANUP = ON);
GO
--Configure the database to use snapshot isolation
ALTER DATABASE MyDB SET ALLOW_SNAPSHOT_ISOLATION ON;
GO
USE MyDB;
GO
--Create a test table
IF NOT EXISTS(SELECT * FROM sys.tables WHERE [name]=N'testTbl')
    CREATE TABLE testTbl(testID INT IDENTITY(1,1) PRIMARY KEY 
    NOT NULL, VAL VARCHAR(64));
GO
--Enable change tracking on the table
IF NOT EXISTS(SELECT * FROM sys.change_tracking_tables WHERE [object_id] = OBJECT_ID(N'testTbl'))
    ALTER TABLE testTbl ENABLE CHANGE_TRACKING;
GO
--Examples of using the Change Tracking functions.
SELECT CHANGE_TRACKING_CURRENT_VERSION();
SELECT CHANGE_TRACKING_MIN_VALID_VERSION(OBJECT_ID(N'testTbl'));INSERT INTO testTbl(VAL) VALUES('V01');
SELECT CHANGE_TRACKING_CURRENT_VERSION();
SELECT CHANGE_TRACKING_MIN_VALID_VERSION(OBJECT_ID(N'testTbl'));
INSERT INTO testTbl(VAL) VALUES('V02'),('V03'),('V04');
SELECT CHANGE_TRACKING_CURRENT_VERSION();
SELECT CHANGE_TRACKING_MIN_VALID_VERSION(OBJECT_ID(N'testTbl'));


The example code above shows the initial values for Change Tracking as well as the changes when you update a row's data. To use Change Tracking you need to reconnect to check that you have a valid version of the data before you process it. Below shows the one-way synchronization scenario.

--This shows the one way sync scenario
SET TRANSACTION ISOLATION LEVEL SNAPSHOT;
DECLARE @Last_sync_version INT = 0;
DECLARE @sync_version INT;
--Use transaction for consistency
BEGIN TRANSACTION
--Make sure the last_sync_version is valid
IF (@Last_sync_version < CHANGE_TRACKING_MIN_VALID_VERSION(OBJECT_ID(N'testTbl')))
    RAISERROR(N'Invalid value', 10, 1);
ELSE
BEGIN
    --Get the current for the next sync
    SET @sync_version = CHANGE_TRACKING_CURRENT_VERSION();
    --Show the current tracking version and change version
    --for each row.
    SELECT testTbl.testID, testTbl.VAL, CT.SYS_CHANGE_VERSION CV,
        CT.SYS_CHANGE_CREATION_VERSION CCV, CT.SYS_CHANGE_OPERATION CO,
        CT.SYS_CHANGE_COLUMNS CC, CT.SYS_CHANGE_CONTEXT CContext
    FROM CHANGETABLE(CHANGES testTbl, @Last_sync_version) AS CT
    LEFT JOIN testTbl ON testTbl.testID = CT.testID;
    SELECT @sync_version;
END
COMMIT TRANSACTION
GO

--Show another session updating the data
UPDATE testTbl SET VAL='New V01' WHERE testID = 1;
INSERT INTO testTbl(VAL) VALUES('V05');
DELETE FROM testTbl WHERE testID = 3;

--The initial session reconnects to get
--changes
SET TRANSACTION ISOLATION LEVEL SNAPSHOT;
DECLARE @Last_sync_version INT = 2;
DECLARE @sync_version INT;
BEGIN TRANSACTION
--Check that you have a valid version
IF(@Last_sync_version < CHANGE_TRACKING_MIN_VALID_VERSION(OBJECT_ID(N'testTbl')))
    RAISERROR(N'Invalid value', 10, 1);
ELSE
BEGIN
    SET @sync_version = CHANGE_TRACKING_CURRENT_VERSION();
    SELECT testTbl.testID, testTbl.VAL, CT.SYS_CHANGE_VERSION CV,
        CT.SYS_CHANGE_CREATION_VERSION CCV, CT.SYS_CHANGE_OPERATION CO,
        CT.SYS_CHANGE_COLUMNS CC, CT.SYS_CHANGE_CONTEXT CContext
    FROM CHANGETABLE(CHANGES testTbl, @Last_sync_version) AS CT
    LEFT JOIN testTbl ON testID.Tbl.MyID = CT.MyID;
    SELECT @sync_version;
END
COMMIT TRANSACTION
GO


There is also two-way synchronization, which is shown below. In the scenario shown, an attempt is made to update the first row. If it can't update the row, the execution path follows the conflict resolution code. This example only uses a table with 2 columns, but in real-world scenarios a table will have far more columns, some of which may have been updated. In this situation, if you are updating columns in a table that haven't been updated, you may choose to proceed.

--Two-way synchronization scenario.
--Assumes the last sync occurred when the sync value was 2
SET TRANSACTION ISOLATION LEVEL SNAPSHOT;
DECLARE @Last_sync_version INT = 2;
DECLARE @sync_version INT;
DECLARE @current_row_version INT;
--Find the current row version for testID=1
SELECT @current_row_version = ISNULL((SELECT CT.SYS_CHANGE_VERSION 
FROM CHANGETABLE(VERSION testTbl, (testID), (1)) CT),0)
SELECT @current_row_version;
BEGIN TRANSACTION
IF (@Last_sync_version < CHANGE_TRACKING_MIN_VALID_VERSION(OBJECT_ID(N'testTbl')))
    RAISERROR(N'Invalid value',10,1);
ELSE
BEGIN
    --Attempt to update the 1st row
    UPDATE testTbl SET VAL = 'NewAppValue'
    FROM testTbl WHERE testID = 1 AND @Last_sync_version >= @current_row_version;
END
IF (@@ROWCOUNT = 0)
BEGIN
    --A conflict is indicated by the execution path (@@ROWCOUNT = 0)
    --Gather more information to see if the VAL column has been updated.
    IF EXISTS(SELECT CHANGE_TRACKING_IS_COLUMN_IN_MASK(2, CT.SYS_CHANGE_COLUMNS) CC
    FROM CHANGETABLE(CHANGES testTbl,@Last_sync_version) CT
    WHERE CT.testID = 1 AND 
    CHANGE_TRACKING_IS_COLUMN_IN_MASK(2,CT.SYS_CHANGE_COLUMNS)=1)
        RAISERROR(N'The column VAL was changed', 10, 1);
        RAISERROR(N'An update conflict has occurred', 10, 1);
END
COMMIT TRANSACTION


Change Tracking fits into Microsoft's "Connect to your data from any device" theme for SQL Server 2008, which is made up of the Microsoft Sync Framework, Sync Services for ADO.Net, SQL Server Compact Edition 3.5. It provides for conflict detection and easy data retrieval of changes with minimum performance impact, and automatic setting for data retention. There are several advantages, such as no schema changes on the tracked tables (no need for a timestamp column), security is at the table level and prevention of loopbacks is easy.

As always, please leave your comments or send email to sql.slinger@gmail.com. I'm always interested in your feedback.

Until next time, happy slinging.

Friday, October 31, 2008

Beyond Auditing

Sometimes capturing the fact that someone changed something and who that someone is, isn't enough. Sometimes, if the values in a row of a table were changed, you need to know what the original values were along with who changed them. Into this space we introduce SQL Server 2008 Change Data Capture (CDC).
This new feature of SQL Server records Data Modification Language operations (INSERT, UPDATE, DELETE) on user tables. The changes are exposed using table-valued functions. The CDC asynchronously reads changes in the source tables from the transaction log and inserts those changes into separate change tables. This feature is available in Enterprise, Developer, and Evaluation editions only.

CDC Diagram

Before we can use this feature we have to configure the database for it. A member of the sysadmin server role must enable CDC on the database by running the sys.sp_cdc_enable_db stored procedure. You can also enable CDC for individual tables only by running sys.sp_cdc_enable_db_change_data_capture.

--First, let's create a demonstration database with a table in it
USE [master];
GO
IF NOT EXISTS (SELECT name FROM sys.databases WHERE name = N'DemoDB')
    CREATE DATABASE [MyDB];
GO
USE [MyDB];
GO
CREATE TABLE MyTable
(MyID INT PRIMARY KEY NOT NULL,
 MyItem VARCHAR(128),
 MyQty INT);
 GO
 
--Next, let's enable CDC on the database
EXEC sys.sp_cdc_enable_db;
GO
--Enable CDC for the Products tableEXEC sys.sp_cdc_enable_table
@source_schema = N'dbo',
@source_name   = N'MyTable',
@role_name     = NULL,
@capture_instance = N'MyTbl_1',
@captured_column_list = N'MyID, MyItem, MyQty',
@filegroup_name = N'PRIMARY',
@supports_net_changes = 1
GO


When you run the two system stored procedures you will see results like these;

Job 'cdc.MyDB_capture' started successfully.
Job 'cdc.MyDB_cleanup' started successfully.

Notice that two jobs are created to monitor/capture and to cleanup the data capture tables.
Now, we have our table, let's put some data into it and modify that data so we can see CDC in action.

--Now let's add some initial data INSERT INTO MyTable(MyID,MyItem,MyQty) Values(1,'Item 1',20),(2,'Item 2',10),(3,'Item 3',1),(4,'Item 4',3); GO--And change it

UPDATE MyTable SET MyQty+=10 WHERE MyID=1; GO Command(s) completed successfully.


Now, when we enabled CDC for the database and the table in it, SQL Server created a pair of Table Valued Functions for us. The functions are named as cdc.fn_get_all_changes_'capture_instance', where 'capture_instance' is the value we specified for @capture_instance in our sp call to enable cdc on the table. In our case they are cdc.fn_cdc_get_all_changes_MyTbl_1. There are also several built-in functions for CDC that make querying information about CDC tables and instances easier. (See BOL for details). We will use two of the built-in functions in our example below.
Here they are in action;
DECLARE @from_lsn binary(10), @to_lsn binary(10);
SELECT @from_lsn = sys.fn_cdc_get_min_lsn(N'MyTbl_1');
SELECT @to_lsn = sys.fn_cdc_get_max_lsn();
SELECT * FROM cdc.fn_cdc_get_all_changes_MyTbl_1(@from_lsn,@to_lsn,N'all');
SELECT * FROM cdc.fn_cdc_get_net_changes_MyTbl_1(@from_lsn,@to_lsn,N'all');
GO

And the results from the above query;
 image
Notice the difference in the results from the two functions. The first function tracks history for every row in the table. It shows Item 1 as it was insert and again after it's update. The second function however, doesn't show the history, but just the net changes. Notice that the initial insert value for Item 1 is missing, only the current value is shown.

To read more on this topic check out the section in SQL Server 2008 Books Online. See all the available system functions associated with it. BOL topic is Change Data Capture.

Until next time, happy slinging.

Thursday, July 31, 2008

Productivity enhancements for SSMS

SQL Server 2008 includes several enhancements geared toward improving productivity and customer satisfaction. Some of the enhancements have been long sought after by the SQL Server database developer and administrator.

IntelliSense!
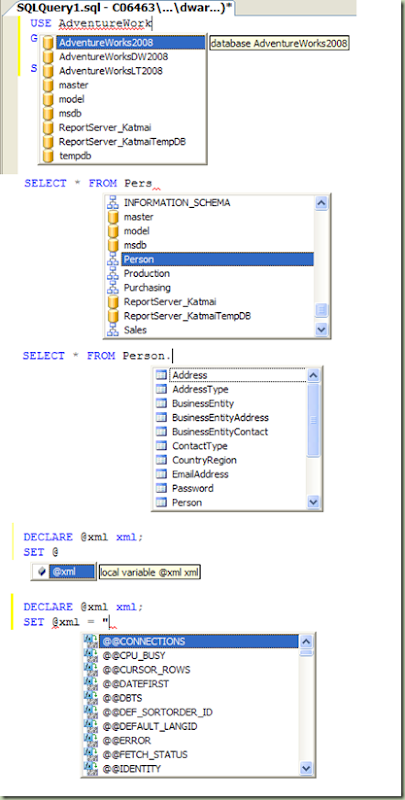
Yes we have long awaited the ability to write T-SQL code with IntelliSense helping code faster. IntelliSense with SQL 08 provides word completion and displays parameter information for functions and stored procs. In the XML editor, IntelliSense can completely show an element declaration. It also indicates errors with red squiggly lines and references them in the Error List window, so you can quickly navigate to the error line by double-clicking the entry. IntelliSense is provided in the Query editor as well as the XML editor, and supports most, but not all, T-SQL syntax. Below are some screen-shots of IntelliSense at work.

SQL08IntelliSenseMix

Collapsible Regions 
Similar functionality is now provided in the SMS08 Query Editor to regions delimited by BEGIN...END blocks and multi-line statements, such as SELECT statements that span two or more lines. This is similar to what Visual Studio has offered for a few releases now. Here's an example (note the '-' sign on the left, click to collapse text):

SQL08Regions

Delimiter Matching
Also similar to Visual Studio, SQL Server 2008 Management Studio now offers delimiter matching and highlighting. When you finish typing the second delimiter in a pair, the editor will highlight both the delimiters, or you can press CTRL + ] to jump to the matching delimiter when you are on one of them. This will help you keep track of parenthesis' and nested blocks. Automatic delimiting will recognize these delimiters;
(...), BEGIN...END, BEGIN...END TRY, BEGIN...END CATCH. Brackets and quotes are not recognized for delimiter highlighting.

SMS Object Explorer
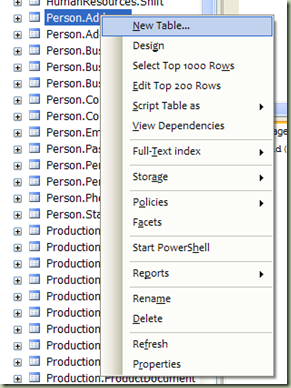
More context menu choices have been provided for your right-click menu in Object Explorer. These choice include options for changing table design, to opening the table with a certain number of returning records, to getting some of the new reports available. Options for partitioning (Storage), Policies, and Indexing are provided as well.

SQL08SMS1

You will notice a new "Start PowerShell" option. Look for a future post to cover the new Windows PowerShell integration.

Integrated T-SQL Debugging
Debugging has now been integrated into the Query Editor! You can set breakpoints, step through code, step into code a particular location, and even set watches up to monitor variable values, locals and the call stack. Woohoo!!!!

Other improvements
Multi-Server queries, allow you to run a query across numerous servers and return the results with the server name prepended.
Launch SQL Profiler directly from Management Studio.
Customizable tabs
, allow you to modify the information shown and the layout from the tools\options dialog.
Object Explorer Detail Pane has been improved for better functionality and productivity with navigational improvements, detailed object information pane at the bottom, and integrated object search.
Object Search, allow you to search within a database on a full or partial string match and return objects to the Object Explorer Details pane.
Activity Monitor, you have to see it to appreciate it. Built brand new from scratch, it is based on the Windows Resource Monitor and allows you to see graphs of processor wait time, waiting processes, database I/O and batch requests. Detail grids are provided for Processes, Resource Waits, Data File I/O, and Recent Expensive Queries. It's a vast improvement for the DBA.
Performance Studio, new performance tuning tool that tracks historical performance metrics and stores them using drill-through reports.
Partitioning Setup GUI, at last a way to create and manage table partitions graphically. This is accessed from the context menu for a table under Storage. A wizard will launch allowing you to create or manage partitions.
Service Broker Hooks, new context menu items centralize access to the Service Broker T-SQL templates for messages, contracts, queues, etc. Read only property pages are provided for each of these objects as well.

The improvements in the toolset provided with SQL Server 2008 are vast and far sweeping. There are more for you to discover and the best way is to get your hands on it. You can download SQL Server Express 2008 from Microsoft if you don't have a developers edition license.

Please, as always, post your comments and questions. Until next time, happy slinging.

Wednesday, July 30, 2008

Auditing, Katmai Style

Ok, once again I've been unable to keep up with daily posts, so I've decided to stop fighting it. Since I'll most likely never be able to consistently post daily, I'm going to quit worrying about it and just focus on posting good content as I can.

In this installment though, let's explore the new Audit feature included in SQL Server 2008. SQL Server 2005 provided auditing via SQL Trace, C2 audit model, and DDL Triggers. While these methods are adequate they leave some room for improvement.

Into that gap steps the SQL Server Audit. This new feature is based on Extended Events and allows you to monitor server-level and database-level events, individually and in groups. The new SQL Server Audit object collects a single instances of the server or database-level actions and groups of actions to be monitored. The Audit object exists at the SQL Server instance level and you can have multiple audit objects per instances.

There are two specification objects can be included in an Audit object, the Server Audit Specification and the Database Audit Specification. You can only specify one server audit specification per audit, however you can have a database audit specification for each database in the instance. You can also only have a server audit specification or database audit specifications, not both.

As you can imagine a server audit specification collects information about the server, which are raised by the Extended Events feature. There are several predefined groups of actions, which are events exposed by the database engine, known as audit action groups. These can be included in your server audit specification object within the audit object.

The database audit specification collects what else but database-level audit actions, which are raised by the Extended Events feature. You can include either groups of actions or single actions to a database audit specification. Again, audit action groups are provided as predefined groups of actions.

So, we can collect all this audit information, now what? Well, obviously this feature wouldn't be complete without the ability to record the information somewhere. This is where the audit target comes into play. Each audit object sends the audit results to a target. That target can be a file, the Windows Security event log, or the Windows Application event log. Note that writing to the Windows Security event log requires elevated permissions, so in order for audit results to be logged there, the SQL Server service account will have to be granted the "Generate security audits" permission in the group or local policy.

The process of creating and using a SQL Server Audit is as follows;
1. Create a SQL Server Audit object
2. Create either a server audit specification or a database audit specification and map it to the audit object.
3. By default the Audit and Specification objects are disabled, so in this step enable them.
4. Auditing occurs and  you can read the data in the target you defined as part of the Audit object.

Let's see an example:

USE master GO --Create the audit object

CREATE SERVER AUDIT SrvAudit TO APPLICATION_LOG; GO --Create the audit specification object

CREATE SERVER AUDIT SPECIFICATION AuditSpec --and map it to the audit object

FOR SERVER AUDIT SrvAudit --then add the audit action group ADD (FAILED_LOGIN_GROUP); GO --Enable the audit ALTER SERVER AUDIT SrvAudit WITH (STATE = ON); GO


So looking at our Application log after attempting to log in with invalid credentials we see:
ApplicationLogKatmaiAuditExample

(Details)
AppLogKatmaiAuditDetailExample

For more information about auditing in SQL Server 2008 check out the SQL Server 2008 BOL, topic Auditing.

Next time we'll look into some of the IDE and configuration tool enhancements. Until then, keep slinging.

Tuesday, July 15, 2008

New Data Types

Well, I managed to miss yesterday, again, so I'm sorry. Luckily, it was only one day, so we aren't falling into a rut yet.

Today I'd like to look at the new data types available in SQL Server 2008. Specifically the new Date and Time, Filestream, and the spatial data storage types.

Date and Time
The new date/time types are a result of improvements that satisfy the requirements of separating date and time values, allowing a larger range or dates, allowing larger fractional second precision, providing Time zone awareness, providing ANSI SQL compliant or equivalent time and date data types, and to allow database migration compatibility with other database platforms.
The new types that allow these requirements to be met are:

DATE Stores only the date portion of a date/time and has a range of 0001-01-01 through 9999-12-31. It has a size of 3 bytes.
TIME(prec) Stores on the time portion of a date/time and has a range of 00:00:00.0000000 through 23:59:59.9999999, an accuracy of 100 nanoseconds (precision dependant). It has a size of 3 to 5 bytes dependant on precision.
DATETIMEOFFSET(prec) Stores a time zone aware, UTC preserved datetime, and has a range of 0001-01-01 00:00:00.0000000 through 9999-12-31 23:59:59.9999999 UTC. It has a size of 8 to 10 bytes, dependant on  precision
DATETIME2(prec) Stores datetime data, similar to datetime data type, but with a far larger range. Range is 0001-01-01 00:00:00.0000000 through 9999-12-31 59:59:59.9999999. This data type is not time zone aware and the size is 6 to 8 bytes dependant on precision.

Along with the new data types, new system functions are also provided:

SYSDATETIME() Returns the current database system timestamp as a datetime2(7) value.
SYSDATETIMEOFFSET() Returns the current database system timestamp as a datetimeoffset(7) value.
SYSUTCDATETIME() Returns the current database system timestamp as a datetime2(7) value, which represents the current UTC time.
SWITCHOFFSET(datetimeoffset, time_zone) Converts a datetimeoffset to a new time zone.
TODATETIMEOFFSET(datetime, time_zone) Converts a local datetime value to a datetimeoffset UTC value using the passed in time_zone value.

Let's look briefly at these new data types in action:
-- Show type usage
DECLARE @DateEx DATE;
DECLARE @TimeEx TIME;
DECLARE @DTOffEx DATETIMEOFFSET(7);
DECLARE @DT2Ex DATETIME2(7);
-- Put in some data
SET @DateEx = '2008-02-28 06:59:01.9489484';
SET @TimeEx = '2008-02-28 06:59:01.9489484';
-- View results
SELECT @DateEx AS [Date], @TimeEx AS [Time]
Output:
Date                    Time
----------------------- ----------------
2008-02-28 00:00:00.000 06:59:01.9489484
(1 rows(s) affected)
------------------------------------------------
-- system date and time
SELECT  SYSDATETIME() AS [SysDateTime], 
        SYSDATETIMEOFFSET() AS SYSDTOffset, 
        SYSUTCDATETIME() AS SysUTC;

Output:
SysDateTime             SYSDTOffset                        SysUTC
----------------------- ---------------------------------- -----------------------
2008-07-15 10:49:55.459 7/15/2008 10:49:55 AM -04:00       2008-07-15 14:49:55.459

(1 rows(s) affected)
-- Offset for a date
SELECT DATENAME(TZoffset, '2008-02-28 12:15:32.1234567 +02:10') AS TZoffset;

Output:
TZoffset
------------------------------
+02:10

(1 rows(s) affected)

--Change the offset
SELECT SWITCHOFFSET ('2008-02-28 9:50:00.6722 -8:00','+02:00') AS Changed

Output:
Changed
----------------------------------
2/28/2008 7:50:00 PM +02:00
(1 rows(s) affected)


Filestream
The Filestream attribute is a storage feature that combines the windows file system with the SQL Server database. When the Filestream attribute is added to a varbinary(max) column the database storage engine stores the column values in the NTFS file system, but the behavior of the database column will remain the same.
Utilizing this feature allows you to access the data in a dual programming model, in other words, you can access the data view T-SQL as if it were a normal BLOB type, as well as via the Win32 streaming API with T-SQL transactional semantics.
So, when should I use Filestream storage as opposed to good old BLOB storage? If your average value size is going to exceed 1MB and you need fast read access, it is a good idea. Also when you are developing middle tier application services that may need to access this data.
Standard BLOB storage is limited to 2GB size restrictions, however, the Filestream storage is only limited by the file system free space. Since the database engine keeps the column behavior consistent, integrated management is maintained, backups and restores work normally as well as third party management tools.
There are a few drawbacks to using the Filestream feature. Support is not provided for Database Snapshots or Database Mirroring, and encryption does not work with Filestream storage.

Spatial Data Types
With all the pressure from Google providing Google Maps, Google Earth, and other geographical services from various sources, it is no wonder Microsoft has begun to provide Spatial Data Storage support.
SQL Server 2008 provides new data types to handle spatial data. These data types are Geometry and Geography. Both data types are implemented as .Net CLR types, and support various methods and properties.
As the name implies, the Geometry data type is designed to store data specified by coordinates in a 2 dimensional, flat-earth system (Euclidean data). It remains compliant with the Open Geospatial Consortium (OGC) Simple Features for SQL Specification version 1.1.0.
The Geography data type, is similar to the Geometry data type in that it stores coordinates, however, the Geography data type stores coordinates defined by latitude and longitude in a round-earth system.
With the use of new data types we need to be able to efficiently store and search for that data, so SQL Server 2008 provides the new Spatial Indexes to go along with the new data types. These indexes are grid-based and level of the index decomposes the one above it.

Here is a diagram from BOL that depicts the structure of the spatial data types.
geometry diagram

See SQL Server 2008 BOL for more detailed information.
Finally, let's take a peek at this in action:

-- Make a table to use that holds geography data type
CREATE TABLE SpatialTable 
    ( id int IDENTITY (1,1),
    GeogCol1 geography, 
    GeogCol2 AS GeogCol1.STAsText() );
GO
-- Put some data into the table to use
-- Notice the use of the STGeomFromText 
-- instance method.
INSERT INTO SpatialTable (GeogCol1)
VALUES (geography::STGeomFromText('LINESTRING(47.656 -122.360, 47.656 -122.343)', 4326));
INSERT INTO SpatialTable (GeogCol1)
VALUES (geography::STGeomFromText('POLYGON((47.653 -122.358, 47.649 -122.348, 47.658 -122.348, 47.658 -122.358, 47.653 -122.358))', 4326));
GO
-- Make some variables
DECLARE @geog1 geography;
DECLARE @geog2 geography;
DECLARE @result geography;
-- Put some data in the variables from the table,
-- notice the use of built in methods/properties
-- of the data type "STAsTex()"
SELECT @geog1 = GeogCol1 FROM SpatialTable WHERE id = 1;
SELECT @geog2 = GeogCol1 FROM SpatialTable WHERE id = 2;
SELECT @result = @geog1.STIntersection(@geog2);
SELECT @result.STAsText();
Output:
------------------------------------------------------------------------------------------
LINESTRING (47.656000260658459 -122.3479999999668, 47.656000130309728 -122.35799999998773)
(1 row(s) affected)
-- Quick example of using the POINT instance
DECLARE @g geometry;
SET @g = geometry::STGeomFromText('POINT (3 4)', 0);
SELECT @g
Output:
------------------------------------------------------------------------------------------
0x00000000010C00000000000008400000000000001040
(1 row(s) affected)


Well, that brings us to the end of another post. I hope you gained something useful from it. I will try really hard to make sure there is a post tomorrow, though I have late meetings this evening so the next entry may be on Thursday. Until then, see you later.

Friday, July 11, 2008

Hierarchy made easier

Well, we are on a roll now, three days in a row! Today let's examine some new data types that have been added to SQL Server 2008.

SQL Server 2008 offers several new data types. One of the more interesting is the HierarchyID type. The HierarchyID data type is implemented as a CLR UDT (User defined type) and is exposed to CLR clients as SqlHierarchyId. The HierarchyID type will allow you to model organization structures, tree structures and hierarchies.
This new data type comes with many built-in methods that will allow you to manipulate and edit hierarchical data.
The methods exposed by the HierarchyID are:

child.GetAncestor(n) - this returns the HierarchyID of the nth ancestor
parent.GetDescendant(child1, child2) - this returns a child node
node.GetLevel() - returns an integer value of the depth of the node in the structure
hierarchyid::GetRoot() - returns the root of the structure
parent.IsDescendant(child) - determines if a node is a descendant of another node
hierarchyid::Parse(string) - converts a string representation of a hierarchyid into a hierarchyid value
void Read(BinaryReader x) - for CLR clients, reads a binary representation of a SqlHierarchyId object from the BinaryReader parameter and sets the SqlHierarchyId object to that value
node.Reparent(OldRoot, NewRoot) - move a node in the hierarchy from one parent to another
node.ToString() - returns a string with a logical representation of the node
void Write(BinaryWriter x) - for CLR clients, writes a binary representation of a SqlHierarchyId object to the BinaryWriter parameter.

You can use any of the above methods that return a node (representation of the hierarchy) in place of HierarchyID data type.

Let's look at how the HierarchyID works (as seen on Ravi Maniam's blog (http://blogs.msdn.com/manisblog/archive/2007/08/17/sql-server-2008-hierarchyid.aspx);

Use AdventureWorks
Go  
--Create Scheme
Create Schema HumanResources 
Go  
--Create Table  
CREATE TABLE HumanResources.EmployeeDemo 
( 
OrgNode HIERARCHYID, 
EmployeeID INT, 
LoginID VARCHAR(100), 
Title VARCHAR(200), 
HireDate DATETIME 
) 
Go 
--Create Index
CREATE UNIQUE CLUSTERED INDEX idxEmployeeDemo 
ON HumanResources.EmployeeDemo (OrgNode,EmployeeID) 

--Insert First Row       
INSERT HumanResources.EmployeeDemo (OrgNode, EmployeeID, LoginID, Title, HireDate)              
VALUES (hierarchyid.GetRoot(), 1,'adventure-works\scott', 'CEO', '3/11/05') ; 
Go           
--Insert Second Row      
DECLARE @Manager hierarchyid            
SELECT @Manager = hierarchyid.GetRoot() FROM HumanResources.EmployeeDemo; 
INSERT HumanResources.EmployeeDemo (OrgNode, EmployeeID, LoginID, Title, HireDate)              
VALUES (@Manager.GetDescendant(NULL,NULL), 2, 'adventure-works\Mark',            
'CTO', '4/05/07')         
Go 
--Insert Third Row
DECLARE @Manager hierarchyid            
DECLARE @FirstChild hierarchyid         
SELECT @Manager = hierarchyid.GetRoot() FROM HumanResources.EmployeeDemo; 
Select @FirstChild = @Manager.GetDescendant(NULL,NULL)              
INSERT HumanResources.EmployeeDemo (OrgNode, EmployeeID, LoginID, Title, HireDate)              
VALUES (@Manager.GetDescendant(@FirstChild,NULL), 3, 'adventure-works\ravi',            
'Director Marketing', '4/08/07')        
Go           
--Insert the First Descendant of a Child Node         
DECLARE @Manager hierarchyid            
SELECT @Manager = CAST('/1/' AS hierarchyid)          
INSERT HumanResources.EmployeeDemo (OrgNode, EmployeeID, LoginID, Title, HireDate)              
VALUES (@Manager.GetDescendant(NULL, NULL),45,        
'adventure-works\Ben','Application Developer', '6/11/07') ;         
Go           
--Insert the Second Descendant of a Child Node        
DECLARE @Manager hierarchyid            
DECLARE @FirstChild hierarchyid         
SELECT @Manager = CAST('/1/' AS hierarchyid)          
SELECT @FirstChild = @Manager.GetDescendant(NULL,NULL)              
INSERT HumanResources.EmployeeDemo (OrgNode, EmployeeID, LoginID, Title, HireDate)              
VALUES (@Manager.GetDescendant(@FirstChild, NULL),55,        
'adventure-works\Laura','Trainee Developer', '6/11/07') ;           
Go           
--Insert the first node who is the Descendant of Director Marketing       
DECLARE @Manager hierarchyid            
DECLARE @FirstChild hierarchyid         
SELECT @Manager = CAST('/2/' AS hierarchyid)          
INSERT HumanResources.EmployeeDemo (OrgNode, EmployeeID, LoginID, Title, HireDate)              
VALUES (@Manager.GetDescendant(NULL, NULL),551,              
'adventure-works\frank','Trainee Sales Exec.', '12/11/07') ;        
Go           
--Insert the second node who is the Descendant of Director
--Marketing
DECLARE @Manager hierarchyid DECLARE @FirstChild hierarchyid SELECT @Manager = CAST('/2/' AS hierarchyid) SELECT @FirstChild = @Manager.GetDescendant(NULL,NULL) INSERT HumanResources.EmployeeDemo (OrgNode, EmployeeID, LoginID, Title, HireDate) VALUES (@Manager.GetDescendant(@FirstChild, NULL),531, 'adventure-works\vijay','Manager Industrial Sales', '12/09/06') ; Go --Insert the third node who is the Descendant of Director
-- Marketing
--in between 2 existing descendants DECLARE @Manager hierarchyid DECLARE @FirstChild hierarchyid DECLARE @SecondChild hierarchyid SELECT @Manager = CAST('/2/' AS hierarchyid) SELECT @FirstChild = @Manager.GetDescendant(NULL,NULL) SELECT @SecondChild = @Manager.GetDescendant(@FirstChild,NULL) INSERT HumanResources.EmployeeDemo (OrgNode, EmployeeID, LoginID, Title, HireDate) VALUES (@Manager.GetDescendant(@FirstChild, @SecondChild),543, 'adventure-works\james','Manager Consumer Sales', '12/04/06') ; --Use Serializable Transaction CREATE PROCEDURE AddEmployee(@ManagerID hierarchyid, @EmpID int, @LogID varchar(100), @JobTitle as varchar(200), @JoiningDate datetime) AS BEGIN DECLARE @LastChild hierarchyid SET TRANSACTION ISOLATION LEVEL SERIALIZABLE BEGIN TRANSACTION SELECT @LastChild = Max(OrgNode) From HumanResources.EmployeeDemo WHERE OrgNode = @ManagerID INSERT HumanResources.EmployeeDemo (OrgNode, EmployeeID, LoginID, Title, HireDate) VALUES(@LastChild, @EmpID,@LogID , @JobTitle, @JoiningDate) COMMIT END ;
 
Please post any questions in the comments and I'll get back to you quickly. I hope you can find a use for the HierarchyID data type in your day to day work.
Have a good weekend and we'll be back on Monday. Remember to post any suggestions for topics or specific questions. You can also email me at sql.slinger@gmail.com.

Thursday, July 10, 2008

Encryption and Key Management

Wow, I'm getting to post two days in a row again. I'm finally getting into the right frame of mind I think.
Today I'd like to look at a couple of new features that SQL Server 2008 introduces. Transparent Data Encryption (TDE) and Extensible Key Management (EKM). These subjects are closely related as we will see further on.
Transparent Data Encryption gives us the ability to encrypt our database objects without the need for changes to the client-side application. In other words, there is no need for us to provide decryption in our database applications. When enabled, data is encrypted prior to being written to the data file. This means that the data in the data file is encrypted, not just the access to it. With all the security concerns around identity theft and lost information, companies now have one less worry. Let's say that a company is running an application entirely on a laptop and storing the data in a local instance of SQL Server 2008. Yeah, I know, why would anyone do that, but for arguments sake, let's say they did. Now if the the laptop is stolen, and the data is not encrypted, the thief could very easily break into the data files, even without the SQL Server login info. But, if that data is encrypted with TDE, then that problem no longer exists. The data file can't be broken simply by attaching it to a new SQL Server. In fact TDE also encrypts backups so that the backup files are also useless to a thief. No more restoring the backup on another server.
TDE encryption is accomplished at the page level. The data is encrypted when it is written to disk and automatically decrypted when it is read from disk. The encryption will be based on a key of course, a database encryption key (DEK) that is protected with a certificate stored in the master database of the server.
As you may know, SQL Server 2005 offered column encryption, but this had its drawbacks. TDE is fully searchable. Column encryption is still part of SQL Server 2008, as it adds a finer control over what is encrypted. If only a few columns in a database need to be encrypted, such as SSN's, salary info, privacy data, then column encryption may be a better choice. TDE encrypts all files of a database, including backups. If you use TDE for a database that is being mirrored, then the mirroring database will have the same encryption. One thing to note is that if any of the databases on a server use TDE, the tempdb database also gets encrypted and can harm performance.
Let's look at enabling TDE for a database.

USE master;
GO

--We need a master key for our database
CREATE MASTER KEY ENCRYPTION
BY PASSWORD='p@ssw0rd';
GO

--Now we need a certificate to protect our key (DEK)
CREATE CERTIFICATE encryptCert
WITH SUBJECT='Certificate to protect DEK';
GO

--Now we change databases (certs and keys are created in the master db)
USE AdventureWorks;
GO

--Let's create our Database Encryption Key (DEK)
CREATE DATABASE ENCRYPTION KEY
WITH ALGORITHM=AES_128
ENCRYPTION BY SERVER CERTIFICATE encryptCert;
GO

--Now all we have to do is enable TDE
ALTER DATABASE AdventureWorks
SET ENCRYPTION ON;
GO

Now, we can protect our DEK in a different way if we choose. We can use the Extensible Key Management (EKM) feature instead. This method will allow us to use an asymmetric key stored on a Hardware Security Module (HSM).It is a good idea, a best practice in fact, to store the keys used in encryption separately from the encrypted data. EKM allows us to follow this. EKM exposes encryption functionality to the vendors who make HSM devices. You can store encryption keys on devices such as USB devices and smartcards. HSM provides: Authentication with an EKM device, Separation of duties by additional authorization checks, Better performance for encrypt/decrypt operations, External generation of keys, storage, retrieval, distribution and disposal of keys, Key rotation.
Since EKM is disabled by default, here is how we enable it:

USE master;
GO

--Enabling is an advanced option
--so let's configure advanced options to show up
EXECUTE sp_configure 'show advanced option', '1';
RECONFIGURE;
EXECUTE sp_configure 'EKM provider enabled', '1';
RECONFIGURE;

--Here is how to protect an EKM module
CREATE DATABASE ENCRYPTION KEY WITH ALGORITHM=AES_256 ENCRYPTION BY EKM_SomeModuleDEK; GO

And that's all there is to it. For now. One thing to note is that TDE and EKM are both based on the Microsoft Cryptographic API (MSCAPI) provider for encryption and key generation. For more information see the SQL Server 2008 BOL and MSDN.

Wednesday, July 9, 2008

Table-valued Parameters

Last post I said I was going to try to get better at posting daily. I must apologize, as I realize it has been over a month, despite the best of intentions. Things are going well and work is getting busy, life is getting busier as well. My wife and I are dealing with our first teenager. I'm sure there are those of you who can sympathize, and those that can't yet, run, while you can. Luckily for me, our oldest son is a good kid, so things could be much, much worse.

Thanks to a gentleman I spoke with yesterday. I was interviewing him for a position at Sogeti, and he actually saw my blog link in my email signature and took the time to peek at it. His interest and feed back have once again prodded me into action. If you read my articles and like them but find I'm not keeping pace with a daily blog, please feel free to drop me an email at sql.slinger@gmail.com. I'm always open to suggestions for topics too.

Well, enough said about that, let's get to today's post.

SQL Server 2005 gave us Table data types for use as variables and return values from functions. One missing piece was the ability to pass table data into a function or stored procedure as a parameter. This is now rectified in SQL Server 2008.

Table-valued parameters offer flexibility, better performance than other methods of passing a list of parameters, and reduce server round trips. They can be used in place of BULK INSERT operations and are backed up by temporary tables, which are stored in the tempdb.

ADO.NET, OLEDB and ODBC. as well as other client data access libraries, now include support for table-valued parameters

A new data type was introduced to support table-valued parameters; the user-defined table type. Not to be confused with the table data type introduced in SQL Server 2005. The user-defined table type defines the structure of the table and allows constraints, such as PRIMARY KEY, UNIQUE, and CHECK to be defined on the table type. DEFAULT constraints are not support, nor are direct index creation.

Let's look at it in action:

USE master; GO IF NOT EXISTS(SELECT name FROM sys.databases WHERE name=N'DBExample') CREATE DATABASE DBExample; GO USE DBExample; GO --Working table definition CREATE TABLE RequestedTopics(TopicID INT, TopicSubject VARCHAR(128)); --Here is where we create the USER-DEFINED TYPE CREATE TYPE BlogTopicType AS TABLE(TopicID INT, TopicSubject VARCHAR(128)); GO --We need a stored procedure to take the parameter CREATE PROCEDURE usp_InsertBlogTopic( @TopicTable BlogTopicType READONLY ) AS BEGIN SET NOCOUNT ON; INSERT INTO RequestedTopics(TopicID, TopicSubject) SELECT TopicID, TopicSubject FROM @TopicTable; END GO --Now let's reference the table type we created DECLARE @BTT AS BlogTopicType; --Populate it with data INSERT INTO @BTT(TopicID, TopicSubject) VALUES(1,'Transparent Encryption'); INSERT INTO @BTT(TopicID, TopicSubject) VALUES(2,'Service Broker Enhancements'); --Now we may as well use something we learned before INSERT INTO @BTT(TopicID, TopicSubject) VALUES(3,'Analysis Services'),(4,'Reporting Services'),(5,'Integration Services'); --Run the stored proc with the table-valued parameter EXECUTE usp_InsertBlogTopic @BTT; --Now let's see what's in our work table

SELECT * FROM RequestedTopics;

Output: ------- --------------- TopicID TopicSubject 1 Transparent Encryption 2 Service Broker Enhancements 3 Analysis Services 4 Reporting Services 5 Integration Services


Wednesday, June 4, 2008

What's New in T-SQL - Pt. 2

Well, like all good things, I have the best intentions of posting daily, and what happens? Life, work, the real world invades. Sorry to be so long adding and improving the blog here.

Let's look at some of the other new features that are now part of T-SQL.

SQL Server 2008 introduces the concept of row constructors. This allows us to create a table or table data type variable and then populate it with multiple sets of data in the same statement.

DECLARE @Product TABLE
(
    ProductID INT,
    ProductName NVARCHAR(64),
    ProductType INT,
    ProductCategory INT
);

--Old way
INSERT INTO @Product (ProductID, ProductName, ProductType, ProductCategory)
VALUES (1,'Widget1',1,1);
INSERT INTO @Product (ProductID, ProductName, ProductType, ProductCategory)
VALUES (2,'Widget2',1,2);
INSERT INTO @Product (ProductID, ProductName, ProductType, ProductCategory)
VALUES (3,'Widget3',2,3);

--New way
INSERT INTO @Product (ProductID, ProductName, ProductType, ProductCategory)
VALUES (4,'Gadget1',3,1), (5,'Gadget2',3,2), (6,'Gadget3',4,1);

Notice the difference! We can insert multiple rows of data in a single insert statement now. You can also use row constructors as pseudo tables if you specify a table name and column names for the set of values in the VALUE clause, as below.

SELECT * FROM (
VALUES(1,'Widget1',1,1),(2,'Widget2',1,2),(3,'Widget3',2,3)
)
Product (ProductID, ProductName, ProductType, ProductCategory);


Output:
ProductID   ProductName ProductType ProductCategory
----------- ----------- ----------- ---------------
1           Widget1     1           1
2           Widget2     1           2
3           Widget3     2           3

(3 row(s) affected)

Another new feature introduced to T-SQL by SQL Server 2008 is Single Statement Variable Declaration and Assignment. This feature allows to declare a variable and assign it's value in the same statement. Similar to other .Net languages.

--assign when declared
DECLARE @myInt INT=1, @MyName NVARCHAR(64)=N'Dan';

--assign from a query return value
DECLARE @myTable TABLE(
    ID INT,
    Name NVARCHAR(64)
);
INSERT INTO @myTable(ID, Name)VALUES(1, 'Dan'),(2, 'Bob');
DECLARE @yourName NVARCHAR(64)=
    (SELECT Name FROM @myTable WHERE ID=2);

One thing to note is that the order of precedence is not enforced when the DECLARE statement is processing. Therefore you cannot use a variable value from the same line to assign to another variable.

The last item for today's post will be Compound Assignment Operators.  Just like C++ and C#, T-SQL now has the compound assignment operators.

Here is a table describing the operators and what they do.

OPERATOR                          DESCRIPTION 
+=                                Add and assign 
-=                                Subtract and assign 
*=                                Multiply and assign 
/=                                Divide and assign 
%=                                Modulo and assign 
&=                                Bitwise AND and assign 
|=                                Bitwise logical OR and assign 
^=                                Bitwise exclusive OR and assign
Compound operators work on the value already assigned to the variable and then use the operator to apply the right-side value to the current variable value.
--assign when declared
DECLARE @myInt INT=1, @MyName NVARCHAR(64)=N'Dan';

--assign from a query return value
DECLARE @myTable TABLE(
    ID INT,
    Name NVARCHAR(64)
);
INSERT INTO @myTable(ID, Name)VALUES(1, 'Dan'),(2, 'Bob');
DECLARE @yourName NVARCHAR(64)=
    (SELECT Name FROM @myTable WHERE ID=2);

Result1     Result2
----------- -------
20          1

(1 row(s) affected)


--Bitwise example
DECLARE @x TINYINT=10,@y TINYINT=2;
SET @x^=@y;  --Exclusive OR of @x by @y
SELECT @x AS Result;

Result
------
8

(1 row(s) affected)


Well, that will rap things up for today. I will endeavor to do better at posting daily. Feel free to leave your comments, whether they are suggestions, requests, or just feedback, they are always welcome.

Wednesday, May 28, 2008

What’s New in T-SQL - Pt. 1

Continuing, or should I say, beginning, our look at SQL Server 2008, I will be spending the next few posts discussing new and improved features in T-SQL.
Let’s start by examining the MERGE statement.
What does the MERGE statement let you do? The MERGE statement will allow you to Insert, Update, and Delete rows in your target table in just a single statement. Before the MERGE statement you would have to do each operation separately using complex join statements or WHERE clauses.      

Syntax:

(from SQL 2008 Books Online)

[ WITH <common_table_expression> [,...n] ]
MERGE 
[ TOP ( expression ) [ PERCENT ] ] 
[ INTO ] target_table [ [ AS ] table_alias ]
        [ WITH ( <merge_hint> ) ]
USING <table_source>
ON <search_condition>
[ WHEN MATCHED [ AND <search_condition> ]
        THEN <merge_matched> ]
[ WHEN [TARGET] NOT MATCHED [ AND <search_condition> ]
        THEN <merge_not_matched> ]
[ WHEN SOURCE NOT MATCHED [ AND <search_condition> ]
        THEN <merge_ matched> ]
<output_clause>
[ OPTION ( <query_hint> [ ,...n ] ) ];

<merge_hint>::=
        { [ <table_hint_limited> [ ,...n ] ]
    [ [ , ] INDEX ( index_val [ ,...n ] ) ] }

<table_source> ::= 
{
        table_or_view_name [ [ AS ] table_alias ] [ <tablesample_clause> ] 
                [ WITH ( table_hint [ [ , ]...n ] ) ] 
    | rowset_function [ [ AS ] table_alias ] 
                [ ( bulk_column_alias [ ,...n ] ) ] 
    | user_defined_function [ [ AS ] table_alias ]
    | OPENXML <openxml_clause> 
    | derived_table [ AS ] table_alias [ ( column_alias [ ,...n ] ) ] 
    | <joined_table> 
    | <pivoted_table> 
    | <unpivoted_table> 
}

<merge_matched>::=
                { UPDATE SET <set_clause> | DELETE }

<set_clause>::=
    { column_name = { expression | DEFAULT | NULL }
  | { udt_column_name. { { property_name = expression 
        | field_name = expression } 
        | method_name ( argument [ ,...n ] ) } }
  | column_name { .WRITE ( expression , @Offset , @Length ) }
  | @variable = expression 
    } [ ,...n ] 

<merge_not_matched>::=
        INSERT [ ( <column_list> ) ] 
                { VALUES ( <values_list> )
             | DEFAULT VALUES }

<output_clause>::=
{
    [ OUTPUT <dml_select_list> INTO { @table_variable | output_table }
        [ (column_list) ] ]
        [ OUTPUT <dml_select_list> ]
}

<dml_select_list>::=
{ <column_name> | scalar_expression } [ [AS] column_alias_identifier ]
     [ ,...n ]

<column_name> ::=
    { DELETED | INSERTED | from_table_name } . { * | column_name }
   | $ACTION

Example:

Scenario: You regularly update a table from a bulk source. The incoming dataset has new records and updates to existing records.
You maintain a table of the current inventory, which is updated nightly to reflect the transactions from the day.

Assumptions: Products are kept in a Product table which is not shown below. A foreign-key relationship exists with the Inventory table. The LastModified field is automatically populated by a default for all inserts.

DECLARE @InventoryMaster TABLE(InventoryID INT IDENTITY,
ProductID INT,
QtyOnHand INT,
ReorderLevel INT,
LastModified datetime DEFAULT GETDATE()
);

DECLARE @DailyTransactions TABLE(ProductID INT, TransQty INT);

INSERT INTO @InventoryMaster (ProductID, QtyOnHand, ReorderLevel) 
VALUES (1, 100, 20), (2, 50, 10), (3, 1000, 100), (25, 200, 50), (26, 200, 20);

INSERT INTO @DailyTransactions (ProductID, TransQty)
VALUES (1, -20), (1, 5), (3, -25), (3, 10), (25, -5), (24, 10), (25, 50);

SELECT * FROM @InventoryMaster;

MERGE @InventoryMaster inv
USING (SELECT ProductID, SUM(TransQty) as TransQty FROM @DailyTransactions GROUP BY ProductID) dt
ON inv.ProductID = dt.ProductID
WHEN MATCHED
THEN UPDATE SET QtyOnHand += TransQty
WHEN NOT MATCHED 
THEN INSERT VALUES(ProductID, TransQty, TransQty*.25,GetDate())
OUTPUT $action,inserted.*,deleted.*;

SELECT * FROM @InventoryMaster;
 
You will notice that the insert statements are a little different than you may be used to. The above example utilizes row constructors (new to SQL Server 2008). You will also keenly observe the use of "+=", and realize that SQL Server 2008 must now allow compound assignment operators, and you would be right. We will cover both of these in tomorrows post.
 
For now, be aware that there are many ways to construct your MERGE statement. The example utilizes a sub-select query from the daily transaction table to sum the amount deltas together. If they aren't summed you will get an error because you are not allowed to perform multiple updates on a row within the same MERGE statement.

Friday, May 23, 2008

Katmai 1st Look

A few weeks ago I presented at a Microsoft/Sogeti USA joint event in Dayton. The topic was SQL Server 2008 - What’s New. I had just over an hour for my presentation, and it turned out this was just not nearly enough time to do justice to all the new and improved features found in Katmai. I have been looking for something to motivate me into starting a blog and now it looks like I have found something. In order to rectify the injustice done to the topic because of time constraints I will be publishing a series of posts on my blog. In each post we’ll explore a new feature or an improvement in depth. Join with me and participate with your comments. Together we will uncover the mysteries of SQL Server 2008.

Look for my next post to begin our journey with "What’s New in T-SQL"